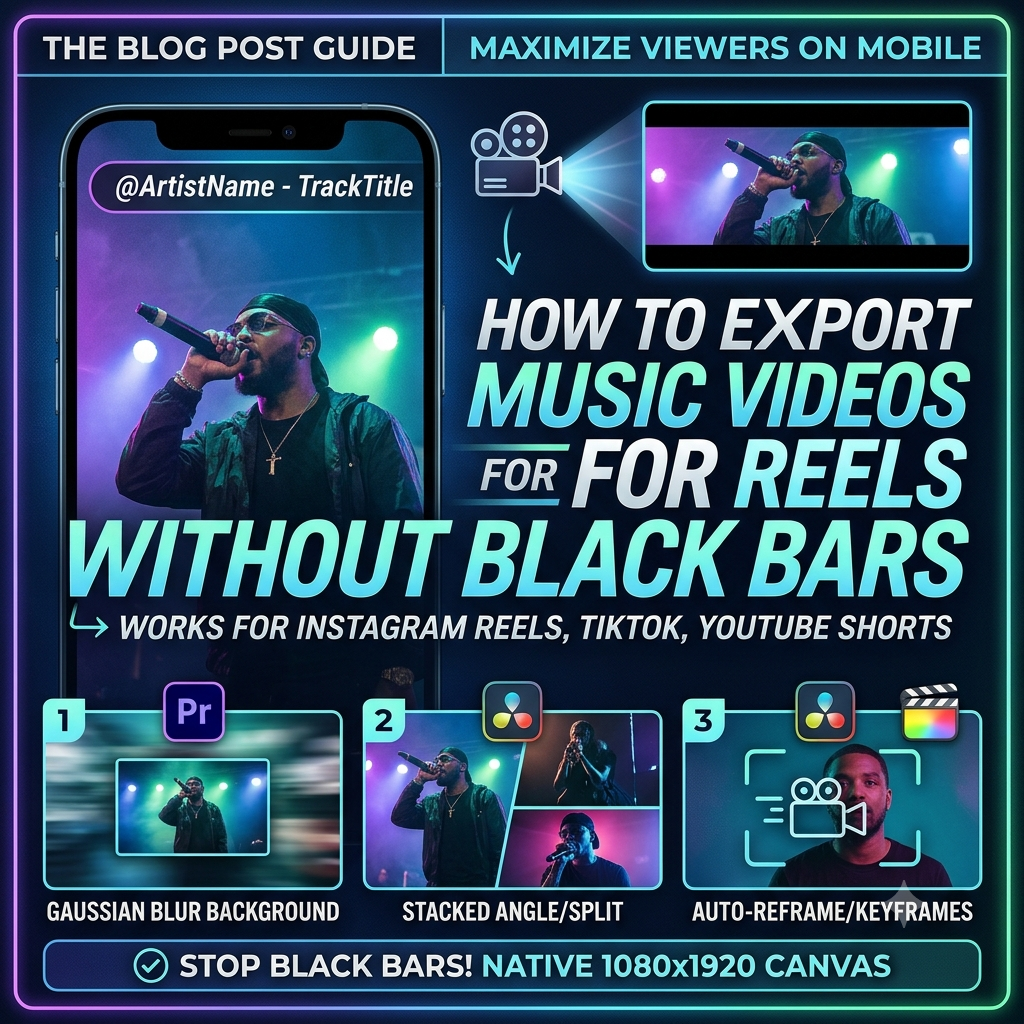
How to Export Music Videos for Instagram Reels Without Black Side Bars
Nothing kills a high-budget music video faster than those thick, ugly black bars on the sides of the screen.
You spend weeks scouting locations, dialing in lighting, renting cinema gear, and fine-tuning color grades in 16:9 widescreen. But the second you drop that video onto Instagram Reels, TikTok, or YouTube Shorts, the platform squeezes your widescreen masterpiece into a tiny box centered on a vertical screen.
The result? Massive pillarboxing (the black bars on the left and right), lost visual impact, and a scroll-through rate that tanks your view counts.
Mobile audiences consume content vertically. If your video doesn’t take up full screen real estate on a smartphone, viewers will keep scrolling. The good news is that you don’t need to re-shoot your video vertically or crop out half of your framing to fix this.
Here is everything you need to know about how to export music videos for Reels without black bars, complete with professional editing techniques, exact canvas setups, render settings, and layout hacks.
Why Widescreen Videos Get Ruined on Instagram Reels
Before fixing the issue in your NLE (Non-Linear Editor), it helps to understand why Instagram forces those black borders on your uploads in the first place.
Instagram Reels operates natively on a 9:16 aspect ratio, which translates to a resolution of 1080×1920 pixels. Standard widescreen video (like YouTube videos or cinema cuts) shoots in a 16:9 aspect ratio (usually 1920×1080 or 3840×2160).
When you upload a horizontal 1920×1080 video to a vertical 1080×1920 container:
-
Instagram fits the entire width (1920) into the available phone screen width (1080).
-
To keep the video proportioned correctly without distorting the image, it shrinks the overall height down to 607 pixels.
-
The remaining top and bottom space (about 1,313 pixels of empty real estate) gets filled in with black borders or grey dead space.
If you try to “force scale” a 16:9 video straight into a portrait frame without reframing it properly, you end up cropping off the left and right sides of your shot. If your lead artist moves slightly off-center, they instantly walk right out of the frame.
To fix this, we have to re-frame horizontal footage inside a native 9:16 vertical canvas before exporting.
3 Editing Hacks to Fill the Vertical Canvas (Without Losing Your Main Shot)
You do not have to settle for basic zoom-and-crop edits. Here are three industry-tested methods top video editors use to turn 16:9 cinema cuts into mobile-ready vertical edits.
1. The Gaussian Blur Background Stack
This is the industry standard for record labels, premiere channels, and music video editors. It allows you to showcase the original 16:9 wide shot in its exact aspect ratio while filling the remaining vertical canvas with a color-matched, animated background.
How to build it step-by-step:
-
Open Premiere Pro, Final Cut, or DaVinci Resolve and create a new sequence set to 1080×1920 resolution (9:16 vertical).
-
Drag your original 16:9 music video onto Video Track 2 (V2). Keep it centered at its native scale.
-
Duplicate that exact video clip directly underneath onto Video Track 1 (V1).
-
Select the clip on V1 (the bottom layer) and go to your Scale settings. Scale V1 up until it completely fills the top and bottom of your vertical 1080×1920 frame.
-
Go to your Effects panel and search for Gaussian Blur. Apply it to the V1 background clip.
-
Increase the Blur Amount somewhere between 40 and 80. Check the “Repeat Edge Pixels” box to make sure the blur doesn’t create dark borders around the edges.
-
Lower the opacity of V1 slightly (around 70–80%), or add a slight dark color drop layer over it.
Now, your main performance shot sits clean and sharp on V2, floating over a glowing, color-matched motion background that reacts perfectly to every lighting change in your original video.
2. The Multi-Angle Stack (Split Screen Edit)
If you shot your music video with multiple cameras or have extra B-roll from performance takes, a stacked split-screen layout keeps the viewer’s eyes moving and fills the portrait frame naturally.
Instead of one giant video box in the middle, you stack two or three video clips vertically:
-
Top Frame: Main wide performance cut or lead vocal shot.
-
Bottom Frame: Cutaway B-roll, crowd reaction, detail shot (e.g., shoe/drip shot, jewelry detail, hands on instrument), or secondary performance angle.
How to set it up:
-
Drag your main cut onto V2 and position it in the top half of your 1080×1920 frame.
-
Drag your secondary B-roll clip onto V1 and position it in the bottom half.
-
Make sure both clips scale to fit the 1080 width cleanly without stretching.
-
Add a subtle, 2-pixel black border or thin graphic divider between the two clips to give the screen a polished, high-production layout.
Tip: Match the edits on the beat. If the top clip cuts on a snare drum hit, let the bottom clip hold for two beats before cutting to create visual syncopation.
3. Dynamic Punch-In & Keyframe Panning
If you want a pure, single-shot vertical video experience, you will need to scale your widescreen footage up so that its height matches the 1920 vertical canvas. Because this clips off the sides of your 16:9 frame, you must actively pan the camera back and forth to keep the action centered.
Option A: Automatic Motion Tracking (Adobe Premiere Pro)
If you edit in Premiere, you can use built-in AI tools to speed this up:
-
Drop your 16:9 video clip into a 1080×1920 timeline.
-
Select your sequence in the Project Panel, right-click, and select Auto Reframe Sequence.
-
Set your target aspect ratio to Vertical 9:16.
-
Set Motion Tracking to Faster Motion (for energetic hip-hop or pop videos) or Default (for slow R&B/indie tracks).
-
Premiere will automatically generate keyframes on the Position controls, tracking the lead artist across the frame as they move.
Option B: Manual Keyframing
For total artistic control, set keyframes manually:
-
Scale your 16:9 clip until the top and bottom touch the edges of the 1080×1920 canvas (usually around 180% to 300% scale depending on your source resolution).
-
Go to your Effect Controls panel and find Position X (Horizontal).
-
Set a keyframe on your Position X parameter at the start of a shot.
-
Scrub forward to where the artist moves to the left or right edge, and shift your Position X value to follow them.
-
Keep your keyframes set to Linear or Ease In/Ease Out for smooth, natural movement.
Safe Zones: Don’t Let Instagram’s UI ruin Your Graphics
One of the biggest mistakes creators make when reframing videos for Instagram is placing text, logos, or main subject features right at the bottom or top of the screen.
When your video plays inside the Instagram Reels feed, the platform overlays heavy user-interface elements directly over your footage:
-
The Bottom Third: Profile handle, caption text, music track details, and comment previews cover roughly 25% of the bottom screen.
-
The Right Side: Like, comment, share, and audio icons sit on the right margin.
-
The Top Bar: Stories navigation and search bars cover the top edge.
The 1080×1350 Safe Zone Rule
To keep your video look professional, keep all critical visual elements—including artist names, song titles, callouts, and lyric captions—inside the 1080×1350 text-safe zone.
| Visual Area | Pixel Range (Y-Axis) | Usage Guidelines |
| Top Danger Zone | 0px - 220px |
Avoid important graphics, text titles, or forehead crops. |
| Center Safe Zone | 220px - 1570px |
Keep all main action, artist faces, and text overlays here. |
| Bottom Danger Zone | 1570px - 1920px |
Reserved for Instagram UI captions, audio titles, and engagement buttons. |
Best Render & Export Settings for Instagram Reels
Once your video looks great in your sequence, you need to export it with settings designed for Instagram’s compression engine. If your file size or bitrate is too high, Instagram will run your video through an aggressive server-side compression script that introduces pixelation, artifacts, and laggy playback.
Here are the optimal export parameters for maximum quality:
| Export Parameter | Recommended Setting |
| Format | H.264 (.mp4) |
| Preset | Custom / Match Source – High Bitrate |
| Frame Width | 1080 pixels |
| Frame Height | 1920 pixels |
| Aspect Ratio | Square Pixels (1.0) |
| Frame Rate | Match your source file (23.976, 24, or 29.97 fps) |
| Field Order | Progressive |
| Bitrate Encoding | VBR, 2-Pass (or VBR, 1-Pass for faster renders) |
| Target Bitrate | 15 Mbps to 20 Mbps |
| Maximum Bitrate | 25 Mbps |
| Audio Format | AAC |
| Audio Channels | Stereo |
| Sample Rate | 48,000 Hz (48 kHz) |
| Audio Bitrate | 320 kbps |
| Color Space | Rec.709 |
Step-by-Step Export Guides for Popular NLEs
Exporting from Adobe Premiere Pro
-
Select your vertical 1080×1920 sequence and hit Ctrl + M (Windows) or Cmd + M (Mac) to open the Export window.
-
Under Format, select H.264.
-
Under Video Tab, ensure Width is set to 1080 and Height is set to 1920. Uncheck match source if it defaults to 16:9.
-
Scroll down to Bitrate Settings. Change Bitrate Encoding to VBR, 2-Pass. Set Target Bitrate to 15 Mbps and Max Bitrate to 20 Mbps.
-
Check the box for Use Maximum Render Quality.
-
Click Export.
Exporting from DaVinci Resolve
-
Navigate to the Deliver page (the rocket icon at the bottom).
-
Set Format to MP4 and Codec to H.264.
-
Under Resolution, select Custom and input 1080 x 1920 Vertical resolution.
-
Set Frame Rate to match your timeline.
-
Under Quality, select Restrict to and enter 18000 Kb/s (18 Mbps).
-
Under Audio, set Format to AAC and Data Rate to 320 Kb/s.
-
Click Add to Render Queue and hit Render All.
Maximize Your Music Video Reach After Uploading
Removing black side bars is the foundation of turning standard widescreen music videos into high-converting mobile assets. Once you have built a clean 1080×1920 cut that grabs attention within the first two seconds of scrolling, you need to put it in front of active music fans.
Once your visual framing and export pipeline are dialed in, you can amplify your mobile video content across dedicated hip-hop channels with our hip-hop video marketing services.